Table of contents
Page contents
Access Points
This is the main part of the test tool: access point testing. Here you can configure your own access point and perform tests on it.
Access point overview
All the access points you have configured are shown in the access point overview. The overview shows a summary of the access point’s information. You can go to a detailed access point view by clicking on any row in the table.
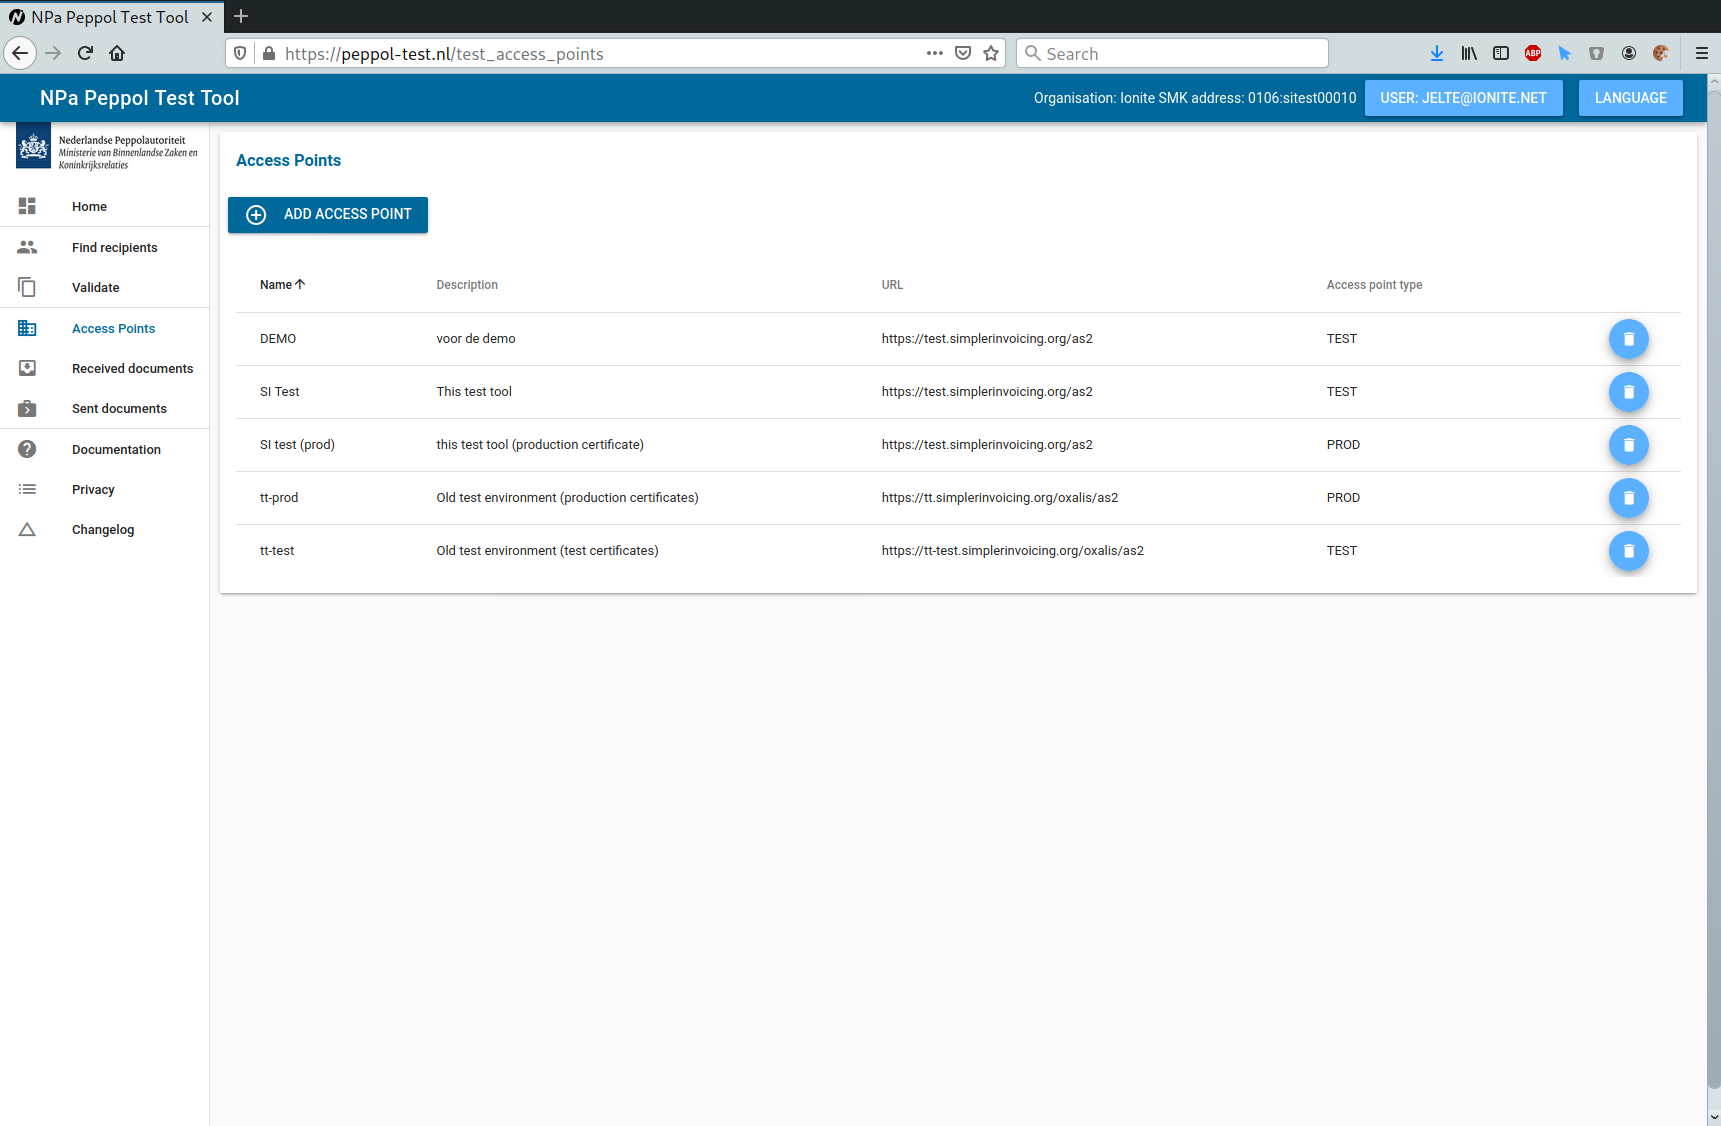
Adding a new access point
To add a new access point, click on ‘Add access point’ in the access point overview.
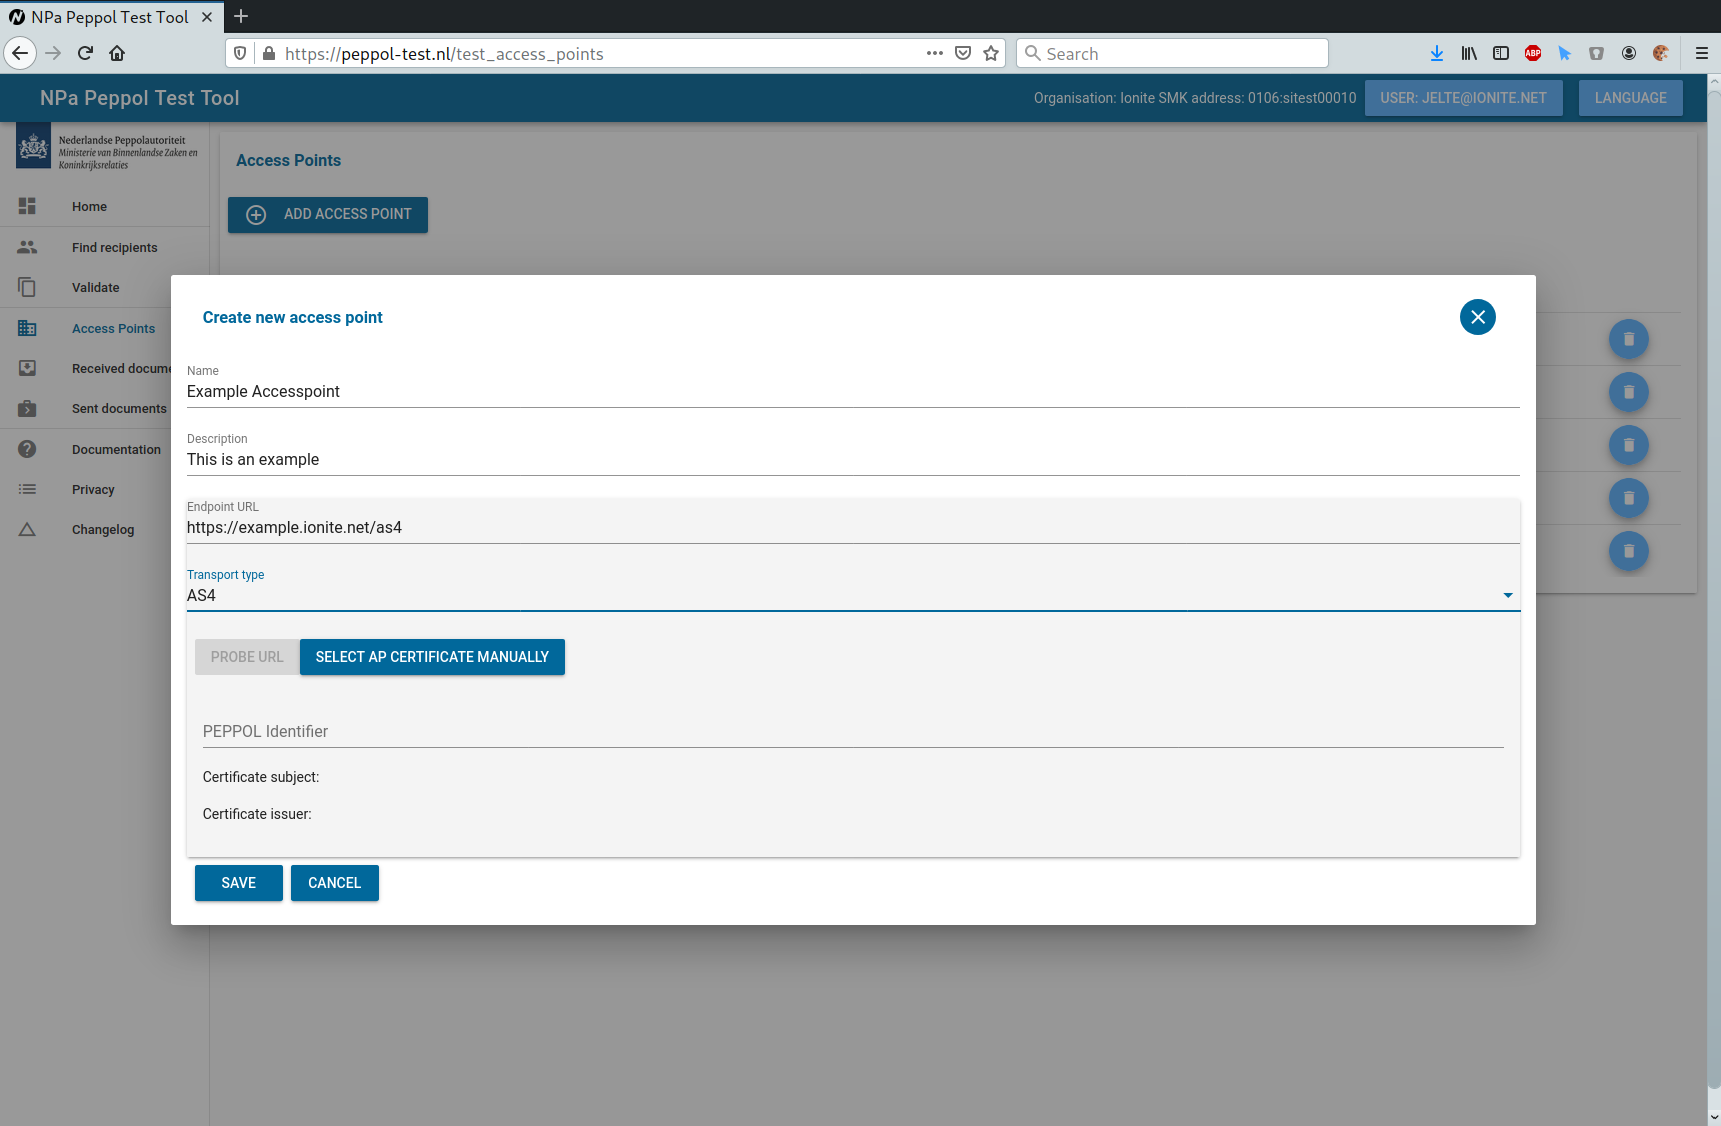
You will be presented with a form containing the following fields:
- Name: The name of this access point. This name will be shown in overviews, selections, and test reports
- Description: A slightly longer description of the access point
- AS2 Endpoint URL: The URL of this access point’s AS2 endpoint, e.g. https://my.domain/as2
When you click ‘Probe URL’, the system will try to automatically discover the certificate of the access point. It will do so by sending an empty AS2 message to the URL configured in the previous field. Note that this may not always work; some access points will send an HTTP error instead of an AS2 error, which does not contain the necessary information regarding the access point’s PEPPOL certificate.
If automatic probing does not work initially, you can try to enter the PEPPOL ID in the next field, and probe again. The PEPPOL ID is the identifier assigned to you by PEPPOl, and can be found in the common name (CN) field of your certificate. An example PEPPOL ID is PNL000066.
If you do not know your PEPPOL ID, or probing fails even if it is filled in, you can upload the certificate manually, by using the ‘Select AP certificate manually’ button. You can upload your PEPPOL certificate in PEM or DER format.
Once the certificate has been configured, you can click ‘Save’ and the access point is stored in the system.
When you are in the detailed access point view, you have three tabs. The tab called ‘Send Documents’ shows the documents that you have sent to this access point, and an option to send documents under ‘Send a document’.
Sending documents from the test tool to your access point
Sending a document
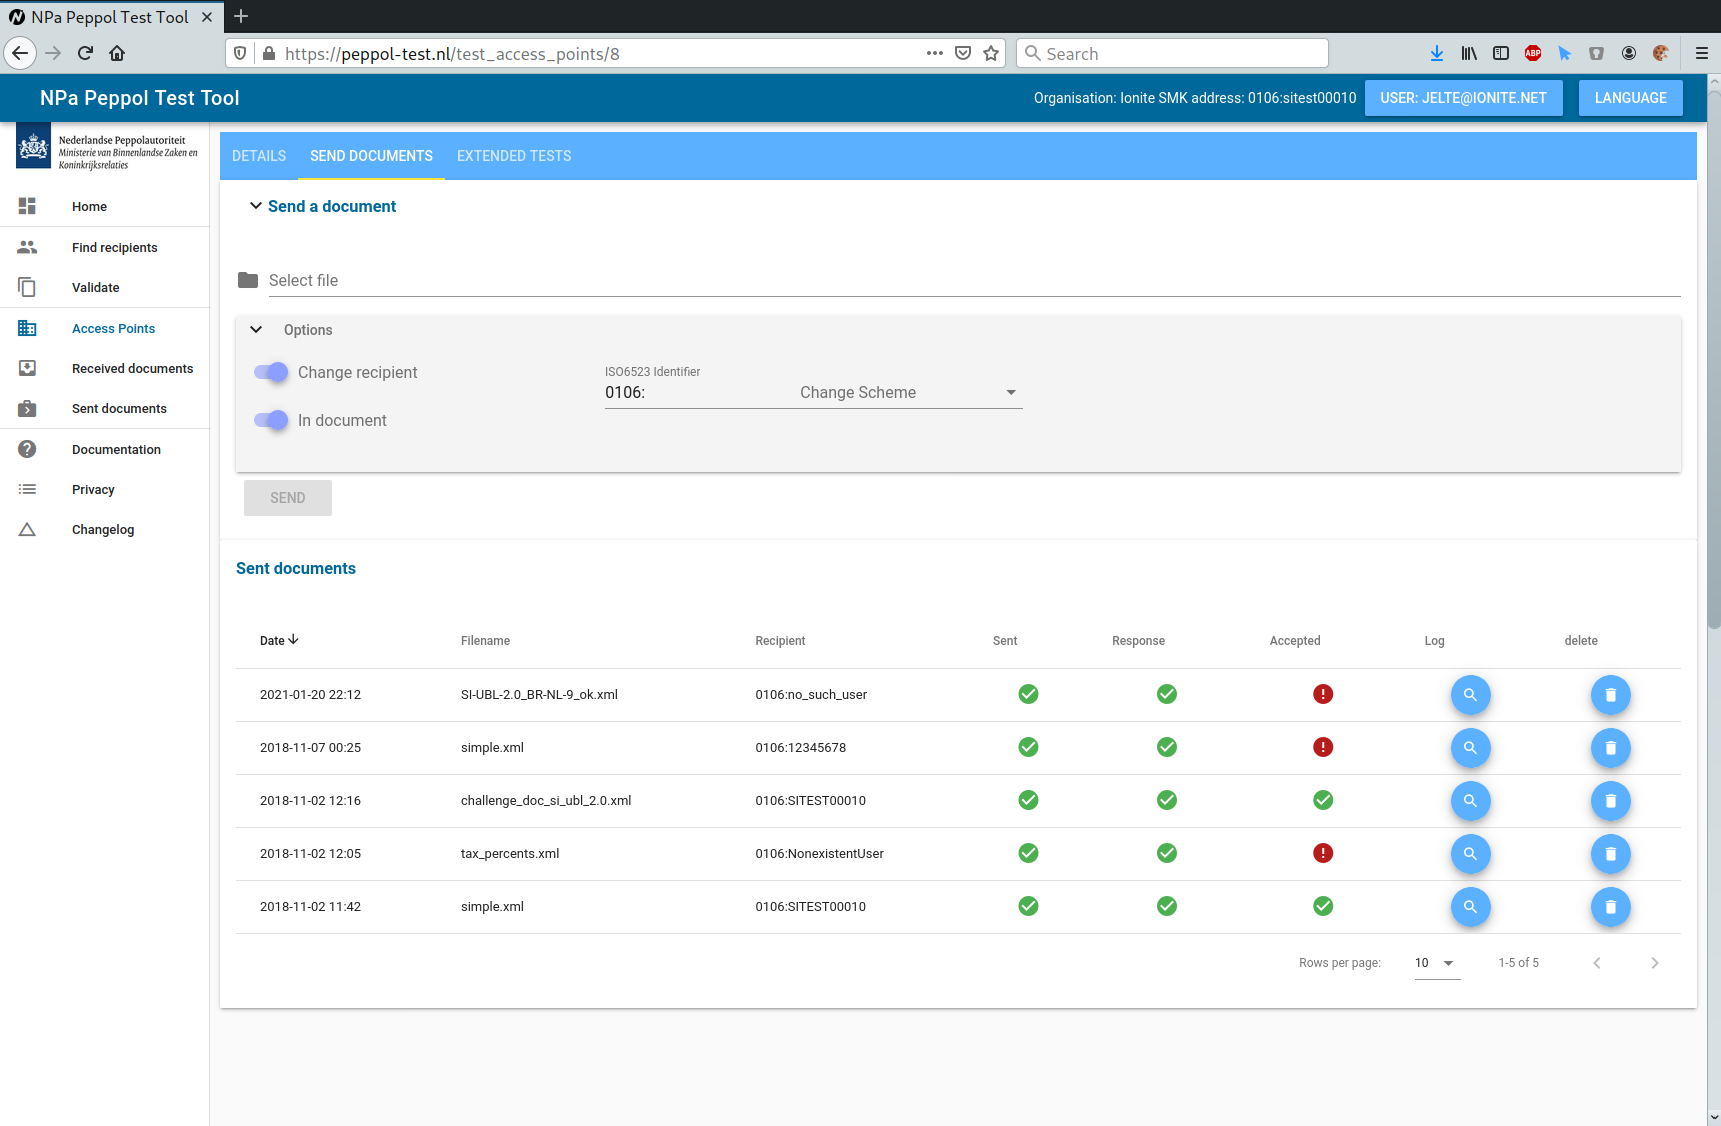
The form to send documents contains the following fields:
- Select file: Here you can select the UBL file from your local computer to send to the access point.
- Options:
- Change recipient: When enabling this option, you can specify the recipient of the document. If this option is disabled, the recipient will be derived from the document itself (from the AccountingCustomerParty section). The document itself is not modified by default.
- In document: When this option is enabled, the document itself is also modified, and the AccountingCustomerParty section will changed to the recipient from the ‘Change Recipient’ field.
Note that the system will only send documents to access points with TEST certificates. Production access points need to be validated first, see Production access point validation for more information.
Sent documents
The table with documents that have been sent shows the following information:
- Date: The date the document was sent
- Filename: The original filename of the document
- Recipient ID: The recipient of the document
- Sent: whether the document was sent
- Response signature: whether the AS2 signature of the access point’s response message was valid
- Accepted: whether the access point indicated the message was received and processed sucessfully
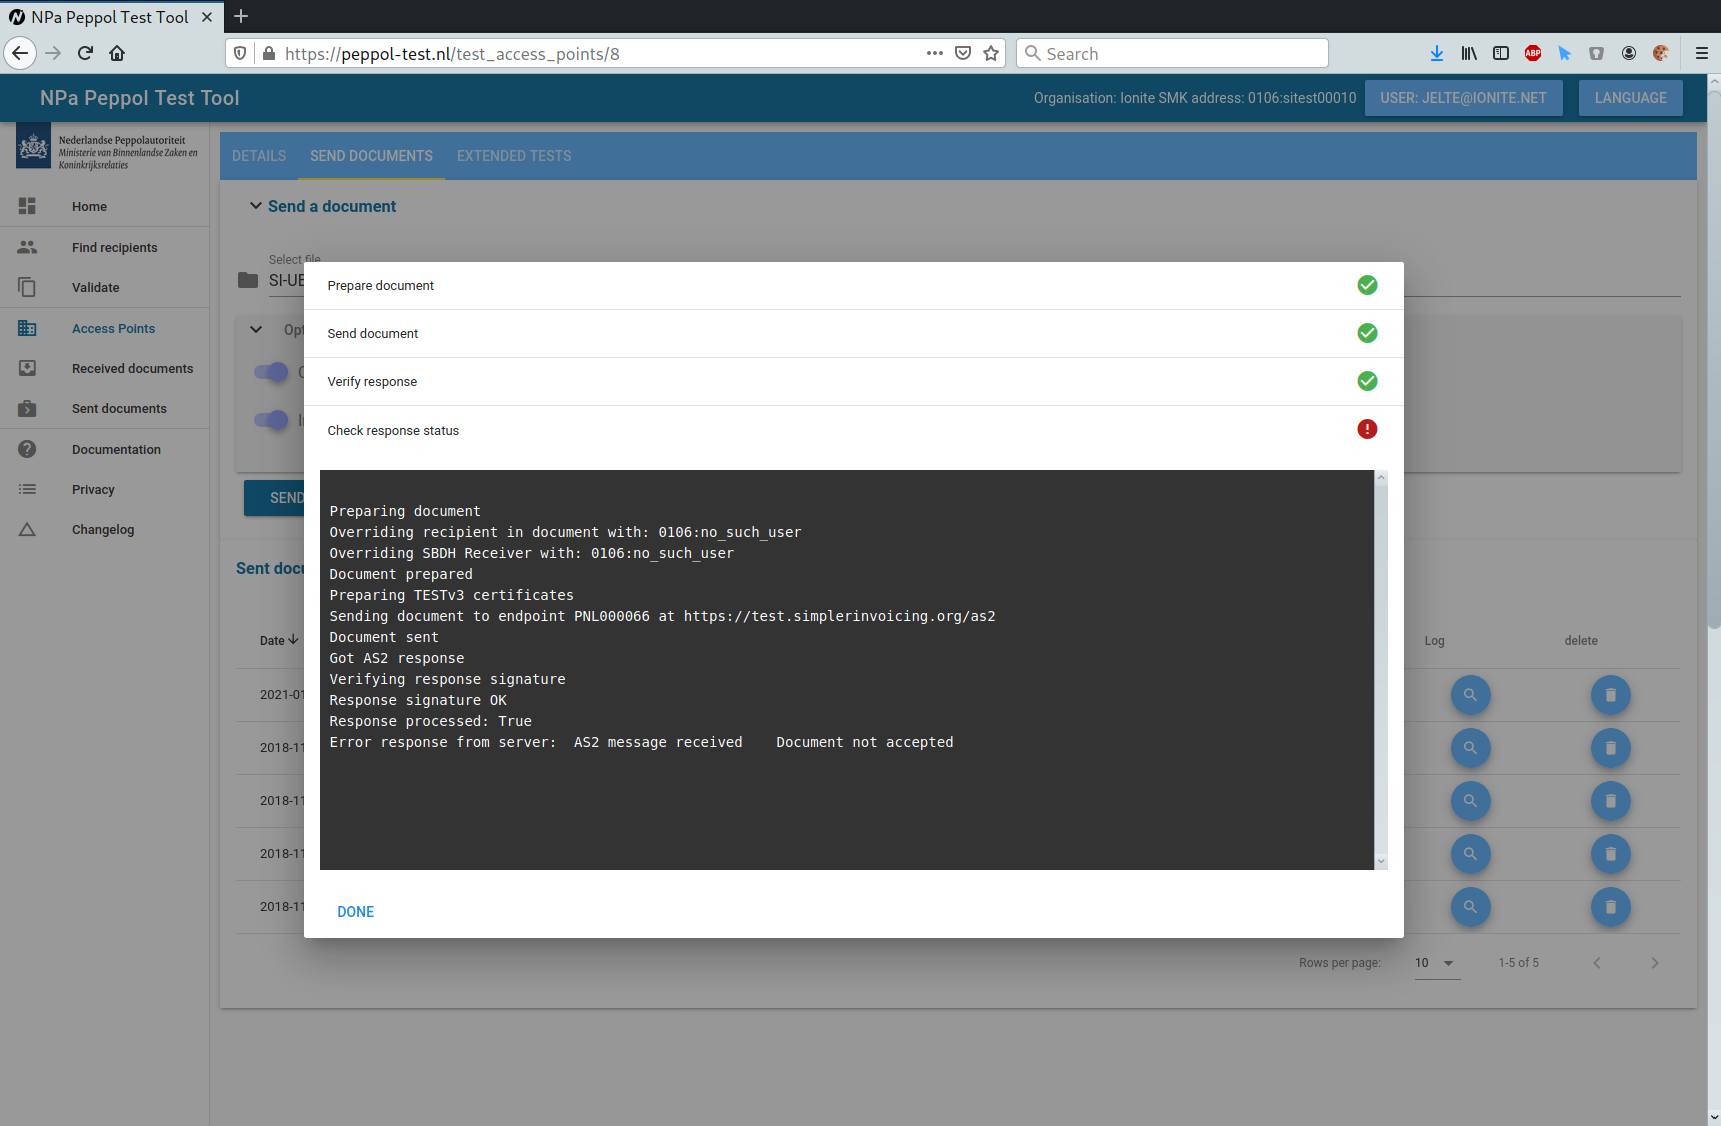
- Log: The test tool’s system log of the transaction
- Request: The AS2 request the test tool sent to the access point
- Response: The AS2 response of the access point
In some cases, the success/error icons can be hovered over to show some more information.
You can click on ‘delete’ to remove the sent document data from the system.
Sending documents from your access point to the test tool
You can send documents from your access point to the identifier show at the top of the page (‘SMK Address’). In the examples in this document that address is 0106:SITEST00010. Note that this is the SMK address, so for lookups your access point needs to look in the SMK, not the SML.
For use with production servers, we have a fixed address in the SML: 0190:00000099003214345003 (9954: in the case of SI-UBL 1.2). Documents sent to that OIN be accepted if the sender identifier has been validated for your account. See validating production access points.
Access point extended tests
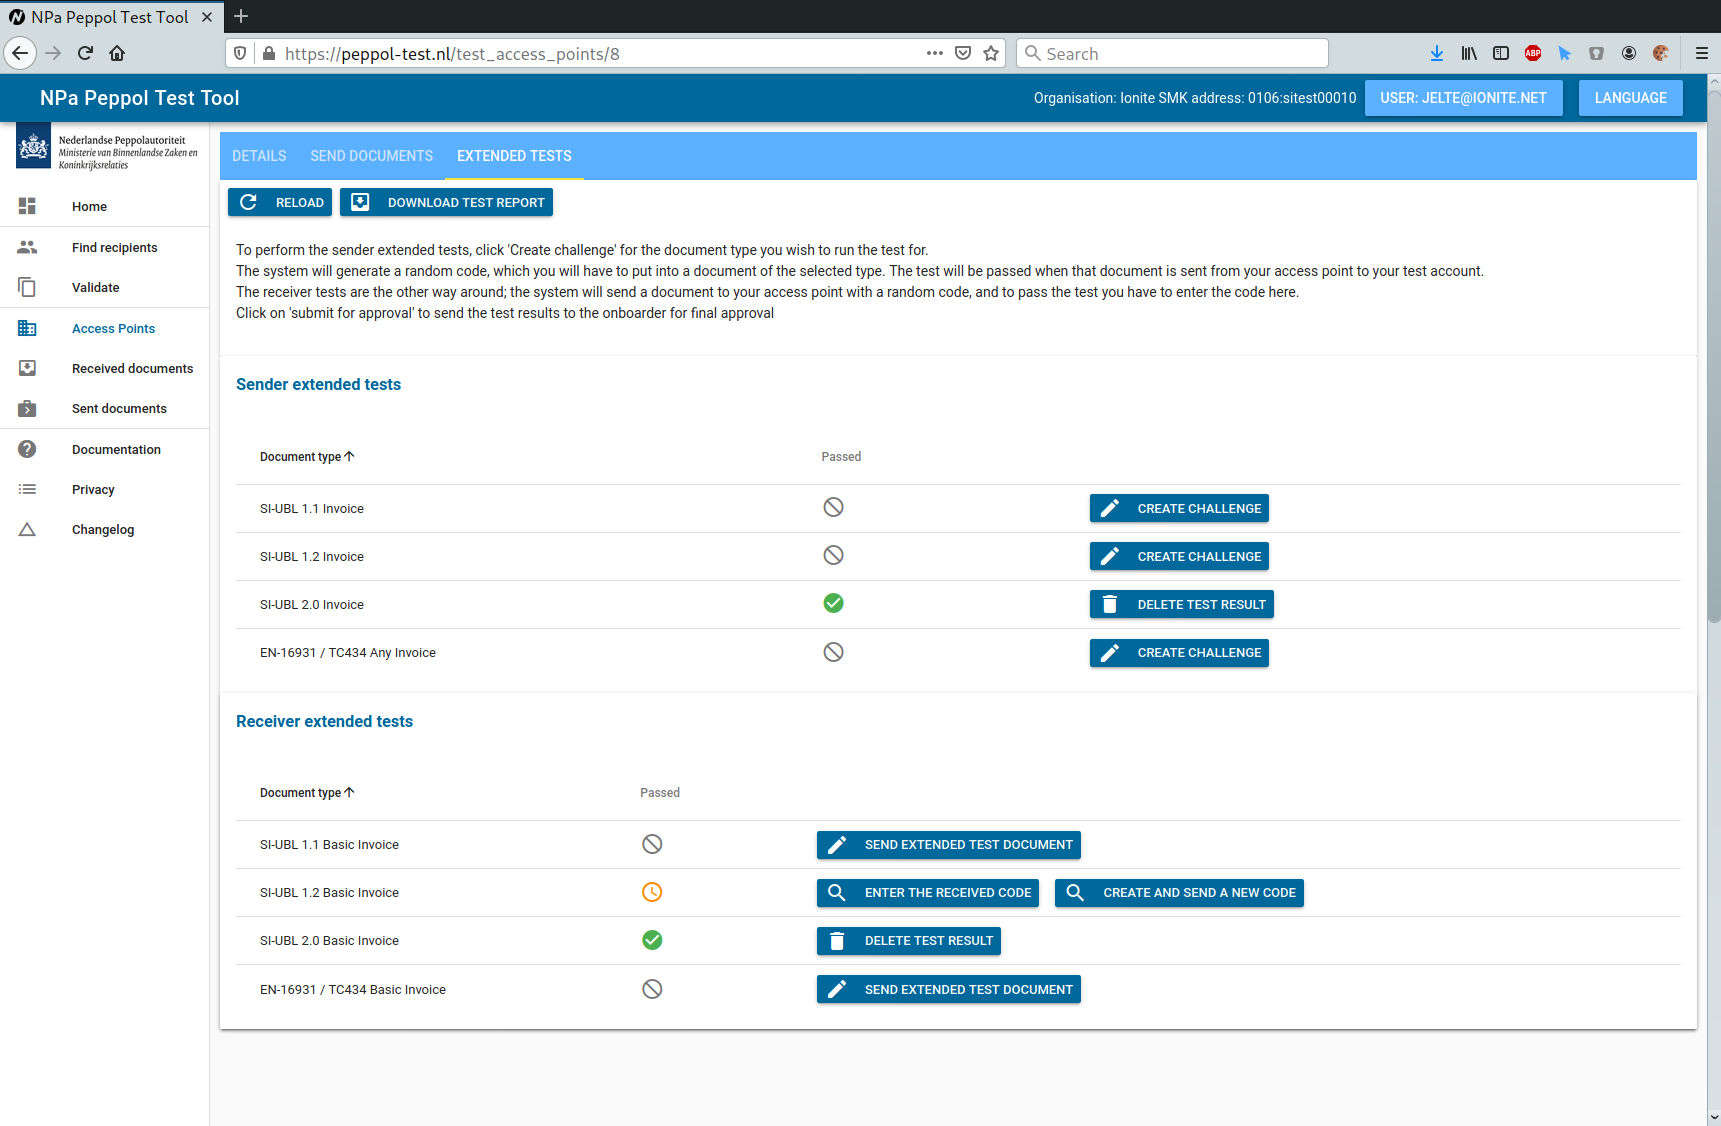
In the extended test tab, you can execute the extended tests and download test reports.
The tests are divided into two sections: Sender tests and Receiver tests.
Sender tests
For sender tests, the system checks whether the access point can send documents.
Right now, there is only a basic test type for several document types. This may be extended in the future with tests with additional requirements.
For the current tests, the process works as follows:
- Click the ‘create challenge’ button.
- The system generates a random challenge code, and the test icon changes to a yellow ‘waiting’ symbol.
- Go to your access point software, and create a document in the format corresponding to the test. This document should have the generated code in either the document-level Note field, or one of the Invoice lines.
- Send the document. If the access point, document type, and challenge code match, the test is resolved as successful. Click ‘reload’ on the top left to update the table.
- If the test was successful, the icon changes to a green checkmark.
Receiver tests
Receiver tests work the other way around; in this case, the system checks whether documents are received and processed correctly by the access point.
Right now, there is only a basic test type for several document types. This may be extended in the future with tests with additional requirements.
For the current tests, the process works as follows:
- Click ‘Send extended test document’ for the format you wish to test
- The system sends a document in the corresponding format to the access point. This document contains a random code in the document-level Note field and the Invoice line.
- Go to your access point or ERP-system and find the generated random code in the received document.
- Click on ‘Enter the received code’ and copy the code into the popup field.
- If the code matches, the test is succesful and the status icon is changed to a green checkmark.
Downloading a test report
If you wish to download a full test report of all succesful tests, including the documents that were received and sent, click on the button ‘download test report’ at the top of the page. Note that only successful tests are included in this report. Pending tests are not shown here.
This feature is just for your own records; you do not need to send this document to the NPa.
NPa Peppol Test Tool documentation
Table of contents
Page contents
Access Points
This is the main part of the test tool: access point testing. Here you can configure your own access point and perform tests on it.
Access point overview
All the access points you have configured are shown in the access point overview. The overview shows a summary of the access point’s information. You can go to a detailed access point view by clicking on any row in the table.
Adding a new access point
To add a new access point, click on ‘Add access point’ in the access point overview.
You will be presented with a form containing the following fields:
- Name: The name of this access point. This name will be shown in overviews, selections, and test reports
- Description: A slightly longer description of the access point
- AS2 Endpoint URL: The URL of this access point’s AS2 endpoint, e.g. https://my.domain/as2
When you click ‘Probe URL’, the system will try to automatically discover the certificate of the access point. It will do so by sending an empty AS2 message to the URL configured in the previous field. Note that this may not always work; some access points will send an HTTP error instead of an AS2 error, which does not contain the necessary information regarding the access point’s PEPPOL certificate.
If automatic probing does not work initially, you can try to enter the PEPPOL ID in the next field, and probe again. The PEPPOL ID is the identifier assigned to you by PEPPOl, and can be found in the common name (CN) field of your certificate. An example PEPPOL ID is PNL000066.
If you do not know your PEPPOL ID, or probing fails even if it is filled in, you can upload the certificate manually, by using the ‘Select AP certificate manually’ button. You can upload your PEPPOL certificate in PEM or DER format.
Once the certificate has been configured, you can click ‘Save’ and the access point is stored in the system.
When you are in the detailed access point view, you have three tabs. The tab called ‘Send Documents’ shows the documents that you have sent to this access point, and an option to send documents under ‘Send a document’.
Sending documents from the test tool to your access point
Sending a document
The form to send documents contains the following fields:
- Select file: Here you can select the UBL file from your local computer to send to the access point.
- Options:
- Change recipient: When enabling this option, you can specify the recipient of the document. If this option is disabled, the recipient will be derived from the document itself (from the AccountingCustomerParty section). The document itself is not modified by default.
- In document: When this option is enabled, the document itself is also modified, and the AccountingCustomerParty section will changed to the recipient from the ‘Change Recipient’ field.
Note that the system will only send documents to access points with TEST certificates. Production access points need to be validated first, see Production access point validation for more information.
Sent documents
The table with documents that have been sent shows the following information:
- Date: The date the document was sent
- Filename: The original filename of the document
- Recipient ID: The recipient of the document
- Sent: whether the document was sent
- Response signature: whether the AS2 signature of the access point’s response message was valid
- Accepted: whether the access point indicated the message was received and processed sucessfully
- Log: The test tool’s system log of the transaction
- Request: The AS2 request the test tool sent to the access point
- Response: The AS2 response of the access point
In some cases, the success/error icons can be hovered over to show some more information.
You can click on ‘delete’ to remove the sent document data from the system.
Sending documents from your access point to the test tool
You can send documents from your access point to the identifier show at the top of the page (‘SMK Address’). In the examples in this document that address is 0106:SITEST00010. Note that this is the SMK address, so for lookups your access point needs to look in the SMK, not the SML.
For use with production servers, we have a fixed address in the SML: 0190:00000099003214345003 (9954: in the case of SI-UBL 1.2). Documents sent to that OIN be accepted if the sender identifier has been validated for your account. See validating production access points.
Access point extended tests
In the extended test tab, you can execute the extended tests and download test reports.
The tests are divided into two sections: Sender tests and Receiver tests.
Sender tests
For sender tests, the system checks whether the access point can send documents.
Right now, there is only a basic test type for several document types. This may be extended in the future with tests with additional requirements.
For the current tests, the process works as follows:
- Click the ‘create challenge’ button.
- The system generates a random challenge code, and the test icon changes to a yellow ‘waiting’ symbol.
- Go to your access point software, and create a document in the format corresponding to the test. This document should have the generated code in either the document-level Note field, or one of the Invoice lines.
- Send the document. If the access point, document type, and challenge code match, the test is resolved as successful. Click ‘reload’ on the top left to update the table.
- If the test was successful, the icon changes to a green checkmark.
Receiver tests
Receiver tests work the other way around; in this case, the system checks whether documents are received and processed correctly by the access point.
Right now, there is only a basic test type for several document types. This may be extended in the future with tests with additional requirements.
For the current tests, the process works as follows:
- Click ‘Send extended test document’ for the format you wish to test
- The system sends a document in the corresponding format to the access point. This document contains a random code in the document-level Note field and the Invoice line.
- Go to your access point or ERP-system and find the generated random code in the received document.
- Click on ‘Enter the received code’ and copy the code into the popup field.
- If the code matches, the test is succesful and the status icon is changed to a green checkmark.
Downloading a test report
If you wish to download a full test report of all succesful tests, including the documents that were received and sent, click on the button ‘download test report’ at the top of the page. Note that only successful tests are included in this report. Pending tests are not shown here.
This feature is just for your own records; you do not need to send this document to the NPa.